Link parties

3/26/11

"I can do hard things" plaque

My husband's best friend from high school and his wife just recently found out that their sweet little girl, Paige, has a brain tumor. They are in Salt Lake City at Primary Children's Medical Center with her and will be there until December giving her chemotherapy. I have been so sad for them and praying a ton, hoping there baby can be strong and get through this. We recently went to a fundraiser for them, that went really well. I wanted to make them something that might help get them through this hard time. I came up with this:

I love this saying....it has helped me through some hard times.

This is what it looks like all wrapped up as a gift.

I printed my picture at Costco, and got the plaque at Walmart.

All you need to do is paint around the edges and the back of it. Let it completely dry.

When it is dry glue your picture on the board

Then with a finger that has no glue on it make sure that you press it completely flat with no bubbles. I just kept running my fingers over it for a couple of minutes.

Then use a mini roller to mod podge the top of the picture. I like the look of the roller over a brush, but you can use a brush as well.

Make sure that you get the sides as well.

Then I added the vinyl saying that I wanted, and then mod podge over the whole thing again.

Then I hot glued some ribbon on the back for it to hang.

And added a bow

I absolutely love how it turned out! I want one for myself. One thing that I have learned is that we all go through hard times, but we can get through anything with the help of our Heavenly Father. We can all do hard things. I wish the best of luck to Paige and we will keep her in our prayers!

3/25/11

Winner of the second giveaway....

So I thought I would be nice and give away the other spring decoration!

So, winner of the Spring version is.....

Jen


Congratulations!!! If you would email me at trinajo5@hotmail.com with your address I will get this in the mail for you!!!

Thanks again for all the entries!


Another chance to win!!!

Okay, so I decided to give both of my spring decorations away today! So it is your last chance to enter Here.

I have to run to the dentist, so I will be announcing the second winner this afternoon!

So exciting....and congratulations to Tiffani for winning the first giveaway this morning!!!

And the winner for the giveaway is......

The winner of the giveaway is....

Tiffani Tarbet


I used Random.org to pick the winner, but I could not get it to appear on my post....I do crafts, not computers....

So if you are Tiffani Tarbet, email me and give me your address, and I will send your choice of the spring or Easter version to you!

Thanks for all who entered....I wish I could send one to all of you!!

I love all my followers!!

This was super fun, I will do another one when I reach 200 followers!!


3/24/11

Giveaway reminder!

Last chance reminder for my giveaway! If you would like me to ship your favorite one to your door, hurry and enter my giveaway Here!

I will be announcing the winner 1st thing in the morning!


A special thanks to all of my followers! I love you all!!!

Zipper pouch tuorial

For my daughters 4th birthday, I decided to make her a pouch that she could hold all of her millions of lip gloss in! I thought it was a good idea, but she doesn't like it because it isn't all pink, so I guess I will be making another one!!! :)

But I still think it is cute, and it wasn't too complicated to make!

You will need :
2 pieces of fabric, one for the outside and one for the lining
1 zipper ( mine was 9 inches long)

So cut your fabric into 11x7 in. pieces

You should have 2 for the outside and 2 for the inside

place your fabric that is going to be on the outside face up and then your zipper face down on top.

Then your lining on top of the zipper, make sure all your edges line up

Sew along the top
Then do it with the other 2 pieces of fabric on the other side

Then when you open it up it should look like this

Then unzip the zipper half way and take the lining sides and line them up and your outer pieces and line them up, one on top of the other...
like this...and sew all the way around the square, leaving about 2-3 inches at the bottom
Then turn it right side out, through the gap that you left in the lining piece and sew the hole up

Then push the lining down into the pouch and there you have it! I nice little zipper pouch! I hope all those steps made sense!

This is what the inside looks like!

I took a little sparkly dragonfly and tied it onto the zipper to make it more girly...it wasn't enough obviously!
Maybe I will use it for my make up....I still like princesses!!!
Or maybe we could use it for storing toys????

I don't know, but I think it is cute!!

3/23/11

Fabric headband

I made this cute headband for my niece for Christmas.

Isn't she cute!! I love how it looks her!

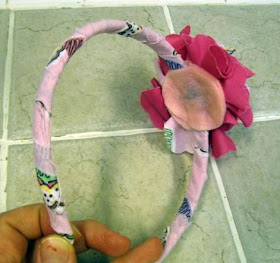
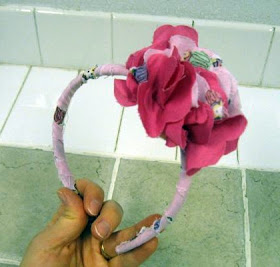
All I did to make it, was I took a headband from the dollar store, and wrapped it with strips of fabric and hot glued it as I went.

Then I used the same method as I did Here, to make the flowers, but instead of stacking them on top of each other, I folded them and glued them on a piece of felt standing up to make it look like this!

Then I took another piece of felt and glued it on the back side of the bow.


They look so cute on!

3/22/11

Spring decor tutorial

As I promised, I am sharing my tutorial on how to make these cute Spring decorations that I am going to be giving away!

Make sure you enter the giveaway Here and I will send you your chose of the Easter or Spring version, whichever you like better!

I will chose the winner Friday morning!
I started with 3 tiles from Home Depot, spring paper, mod podge, and my silhouette

Cut your paper the size of your tiles, a little smaller, and glue them onto your tiles. Make sure all the bubbles are out.
Then take some mod podge and a mini roller and spread evenly over each tile.

Now you have 3 tiles covered with paper.

Then I cut my vinyl out with my silhouette and rubbed them onto the tiles.
Then I Distressed the edges a bit.


I then put another layer of mod podge over them again, just so my vinyl doesn't come off.

Then I added a few gems to pretty them up a bit!

Then take ribbon and hot glue it onto the back of the tiles, make sure you have them centered and even.

I took some thinner ribbon and glued 2 pieces on the top so I could hang it.

And there you have it....some cute springy decorations!


Go enter to win your favorite one!!!